Pages

Showing posts with label Tips. Show all posts

Wednesday, October 27, 2010

Raquach Commission

here is the finished pic-->Hollow Child

here is the step by step process.
Click the pic for more bigger preview.. ^^
tools : pencil sketch, anmd PainterXI
here is the sketch, made on a4 papper with pencil.


I put the sketch in different layer turn it into multiply mode,and color the back ground


choosing the colour first before I start to paint everything, just blocked the part I want with the color, becouse its a painting, I do it in one layer to make it simple.


give the shading and all.. as you can see, Im more focus on the girl side.. :P


well youi know the rest, just brush here and there,painting are sculpting and make sumthing have a 3D shape with color, its a hard thing, but doable.. just be patient.. :D


is the detail of the pic


Tuesday, December 1, 2009

Tutorial :how to draw chibi

okay this is chibi commission that I made for miss Ama , and as I promised to dear Sarah, I will show my chibi coloring technique.

in this tutorial I dont show what kinda brush I use, if you follow my others tutorial, you will realize I always use the same brush, just like I use for this one to.. XD, so I think it doesn't matter if I dont describe the brush, but I will try to explained this tut as much as I can.
for this tut you need a pen tablet and painter/photoshop program.
well then... here we go.. XD
just click the pic to get much bigger view

step 1


made a chibi sketch, this is my chibi proportion, look more tall that size deformed (SD),well yeah... because its chibi or child body.. XD
btw, the bigger the head, the cuter it gets.. but its just a matter of taste.. mine are not very big I think.. :D


step 2


after I ink the sketch, I block the whole colored area, with any kind of colour I want, than lock the layer options into transparancy, and randomly gave all the additional basic colors.


step 3


added the shading and lighting, looks very random yeah? well it is.. =_=a


step 4


add details, and of course the hair to, I always using big to small brush for adding the details, and if there is any lines or stroke that I didn't like, I just use blender to smooth it and it will look like gradation.. :D


step 5


see? its looking smooth rite? that is the power of blender on painter.. XD


step 6


making chibi dont look so hard is it? XD add the details and simple background all you want, and VIOLA! its all done..:)

the RESULT

Monday, July 6, 2009

How to Edit Sketch with Photoshop

this is Fantasy Sketch Tutorial.. :) so many step, but its all are simple and easy, I hope this tut will help.. :D
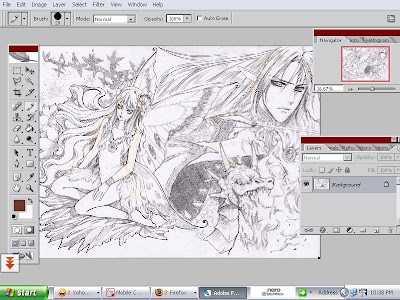


first, this is the sketch that I already scan and put it into potoshop, the yellow/orange lines are the layout that I made with coloured pencil before I started the sketch. the file are made into RGB mode.
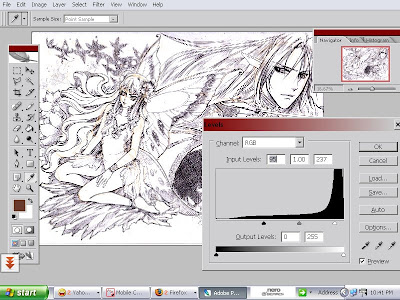


type ctrl+l (level command) this is to make the line from the pencil more black, and the grey tones, turn into more withe, because the scanner result dont catch the whole lines, the level command make the lines become more visible and strong.
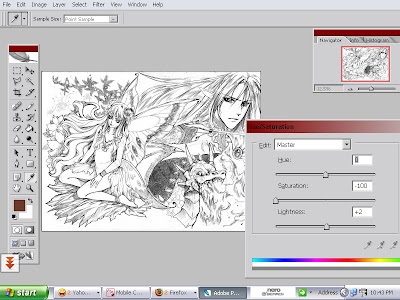


type ctrl+ U this is hue/saturation command, turn he saturation into -100,I use this so the yellow/orange from color pencil became grey.
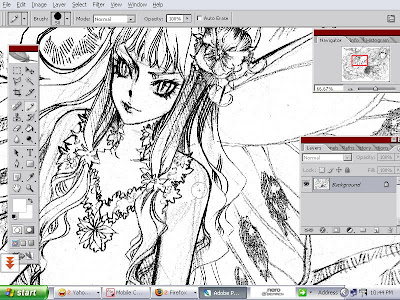


type ctrl+b, into the pencil mode, and with white colours, I clean the grey area that I dont wanted to be on the pic.
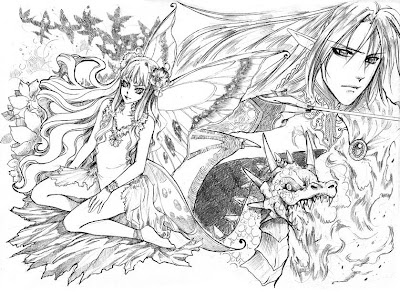


after I clean up everything, this is the result
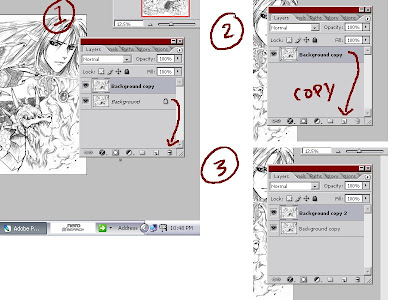


the pic is on the background layer, and its locked, to change it, I simply copy the background into 'background copy', throw away the background, and make another one by copy the 'background copy', into 'background copy 2'.
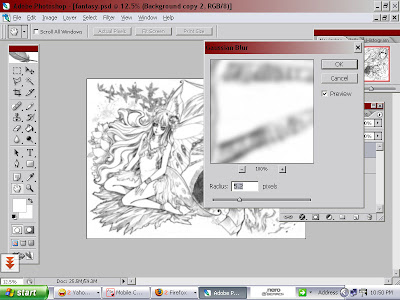


I change the layer 'background copy 2'. who are on top layer 'background copy'. into Gaussian blur.
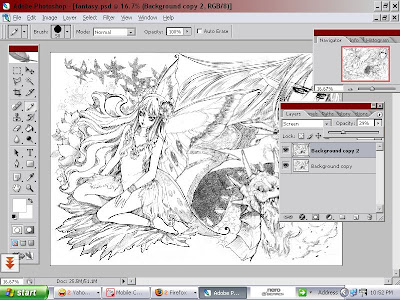


the layer 'background copy 2' who are now became blur,I change it into screen mode, and adjust the opacity.
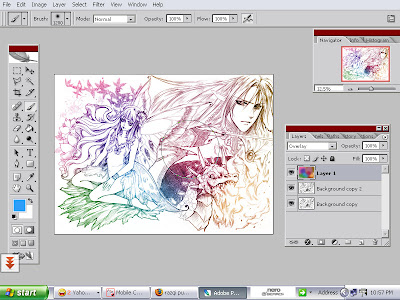


on top layer layer 'background copy 2' 2' I add another layer (layer one) change it into overlay mode and put so many colours in 'layer 1' as I like with big round soft airbrush ^_^..
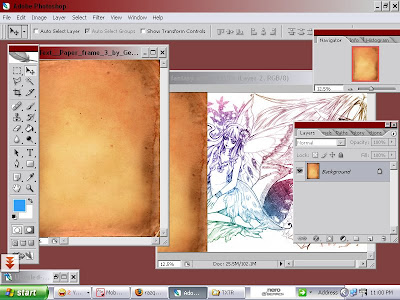


I found some nice texture , drag it to the pic
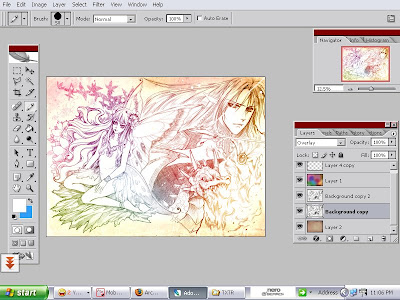


the texture layer (layer 2) are placed in the bottom layer, and I change the layer 'background copy' into overlay mode. change the 'layer2' opacity, so the colour not that strong, and the pic merge nicely with the texture..

and its all done. :D

the sketch : step by step


the Result

Saturday, June 27, 2009

How to Colouring with Photoshop tutorial : moonbeam

FORGIVE ME FOR SO MANY TYPOS AND GRAMMAR ERROR! CAUTION! THE FOLLOWING TUT WILL SHOW YOU HOW LOW MY LINGUISTIC ABILITY!
*A*

This is tutorial about the charachter I made, Moonbeam, for my commissioner White Knight.
to done this tutorial,you need a photoshop program, a pen tablet, and a lot of patience and creativity, but most of all.. just have fun!


this is the final RESULT

I hope this tutorial help, for the complete tutorial, you can download it HERE
Moon beam are original charachter of White Knight. and all the copyrights properties are belong to him only, do not abuse!

Saturday, June 6, 2009

tips sebelom mengomik..

bikin komik ituh, gampang2 susah.. sebenernyah sih kalo udah siap storyboard, dan tinggal gambar mah gampang2 ajah.. :d tapi kalo udah nggak mood, duh amit2 susahnyah.. dan mood ituh lah yang susah dicari..:D dalam bikin komik, butuh dedikasi yang kuat untuk tetep negerjain naskah, walaupun beribu rintangan menghalangi.
seperti tiba2 ngantuk, belom cek wall di FB, inget kalo ada acara menarik di tipi, ato laper dan haus terus menerus..:P, pengen browsing2 internet.. =_= halah


nah dripada ituh kalo sayah mah sebelom bikin komik harus persiapan dulu sebelom moodnyah keluar.. diantaranya:
-niat dan baca bismillah, semoga moodnyah keluar dengan lancar
-mandi dulu biar harum, kalo ngomik ituh, nggak tawu kenapa suka keluar keringat banyak, so kalo badanyah bawu, terus campur ama keringet.. lumayan mengerikan suasananyah..(padahal jaman dulu paling benci yang namanyah mandi.. kalo sekarang apa boleh buat.. @_@; )
-setel lagu penyemangat
-siap2 air putih 1000ml plus cemilan yang aman (dengan kata lain bukan cemilan yang berpotensi mengotori naskah apabila berceceran)
-siapin referensi secukupnya.(majalah, komik lain?, google search?)
-bikin tulisan segede2 gambreng dengan kata2 penyemangat, dan berjanji akan disiplin :D )
-membereskan dulu meja kerja biar enak gak belepotan.

kalo sudah semua, biasanyah semangat ngomik mengebu2.. :D kalo moodnyah surut lagi..
yah cobalah istirahat dulu 5 menit.. gak usah dipaksain.. tapi kalo udah 5 menit, lanjut lagi dong.. jangan jadi asik ngerjain yang lain..seperti malahan ngeblog kayak gini misalnyah..
hahhaha

ngomik lagi aaaah
SEMANGAT!!

Tuesday, April 21, 2009

Shiloh :Hair painting with painter X

still a commission for Feliane
this time is a sneak peek to Shiloh hair. :D

CLICK FOR MORE BIGGER VIEW


I made his hair on painter X, if you guys interested in hair tutorial on painter,than checkout THIS

Friday, April 3, 2009

How to draw with painter X Tutorial: Delilah

This is the tutorial I promised..
a Commission from one of my client Omega Raptor.
Im sorry if the tutorial is kinda hard to understand or anything.. I dunno how to made a good tut (your comments, critiques and guidance will be so much help)

to made this kinda painting, all you need is patience, knowledge of anatomy, lighting and painting clothes.. (sound hard? well yeah.. *lol* )
but if I can do it, I know you guys can to, I start from nothing, and now I be able to do this.. not easy, but doable.. :D

GOOD LUCK!

*click for more bigger view


you can see the final result here

NB; sorry for the typos and grammar /_\

Thursday, November 20, 2008

Hair tutorial


click it for more full size
Im sorry if its to small.. I cant uploaded more bigger than this >_>
you have to save it and use your photoshop or preview in your computer to look more bigger

Im just not to god in making tut..
:P